
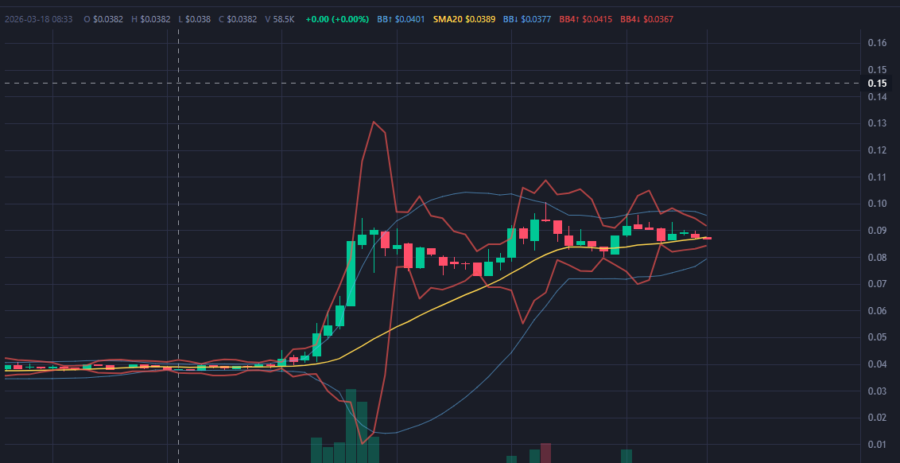
Bollinger Bands are one of the most widely used technical indicators in trading, offering insight into both market volatility and the relative position of price. While the standard configuration (20,2) is effective for swing trading and broader trend analysis, short-term traders often require faster and more responsive settings. This need has led to the development of the Double Bollinger Band strategy, particularly the combination of (4,4) and (12,2), which is designed to capture both micro-momentum and directional bias simultaneously.
To understand this strategy, it is important to first break down the role of each component. The (4,4) Bollinger Band is extremely sensitive due to its very short lookback period of just four candles and a wide standard deviation multiplier of four. This configuration causes the bands to expand aggressively during volatility spikes and contract quickly during consolidation. As a result, it reacts almost instantly to price acceleration, making it ideal for detecting breakout attempts, momentum surges, and exhaustion moves in very short timeframes.
In contrast, the (12,2) Bollinger Band provides a more stable and balanced view of the market. With a longer lookback period and a standard deviation of two, it smooths out noise and helps define the prevailing trend. Traders often use the position of price relative to the middle band (the moving average) and the outer bands to determine whether the market is trending upward, downward, or moving sideways. For example, sustained movement above the middle band suggests bullish control, while repeated rejection below it signals bearish dominance.
The core strength of the Double Bollinger Band strategy lies in combining these two perspectives into a single framework. The (12,2) band acts as a trend filter, while the (4,4) band serves as a precision timing tool. This separation of roles is crucial. Instead of blindly reacting to every signal, traders first identify the broader context using the (12,2) band and then refine their entries using the (4,4) band.
A common long setup begins with identifying an uptrend through the (12,2) band. This could mean that price is consistently holding above the middle band or repeatedly touching the upper band without significant rejection. Once this context is established, traders look for pullbacks toward the middle band or slight dips within the structure. The key moment occurs when price re-accelerates and approaches or breaks the upper band of the (4,4). This indicates renewed momentum and often provides a high-probability entry point.
Similarly, for short positions, traders look for a confirmed downtrend using the (12,2) band. If price remains below the middle band and shows repeated weakness, a rally into resistance followed by a move toward the lower band of the (4,4) can signal an entry opportunity. The idea is always the same: align with the higher timeframe bias and use the faster band to time execution.
Exit strategies can vary depending on trading style, but several common approaches exist. One method is to take profits when price reaches the outer band of the (4,4), as this often represents a short-term extreme. Another approach is to exit when momentum weakens, such as when a strong trend candle is followed by indecision or reversal patterns. More advanced traders may trail their stop using the middle band of the (12,2), allowing them to capture extended moves while still managing risk.
Despite its strengths, the Double Bollinger Band strategy is not without limitations. The high sensitivity of the (4,4) band means it can generate false signals, especially in low-volatility or sideways markets. During such conditions, price may frequently touch the bands without meaningful follow-through, leading to whipsaws. To mitigate this, traders often incorporate additional filters such as volume analysis, VWAP positioning, or support and resistance levels.
Another important consideration is market selection. This strategy tends to perform best in instruments with strong intraday volatility, such as U.S. equities, index futures like Nasdaq (NQ), or even certain cryptocurrencies. In slow or illiquid markets, the effectiveness of the setup may decrease significantly.
Risk management also plays a critical role. Because the entries are often based on short-term momentum, it is essential to define clear stop-loss levels. Many traders place stops just beyond recent swing highs or lows, or slightly outside the (12,2) band structure. Position sizing should also be adjusted to account for the increased frequency of trades and the potential for rapid price movement.
In conclusion, the Double Bollinger Band strategy using (4,4) and (12,2) offers a powerful and flexible approach to short-term trading. By separating trend identification from entry timing, it allows traders to make more structured and disciplined decisions. While it requires practice and proper risk management, it can be highly effective when applied in the right market conditions and combined with complementary indicators. For traders seeking a balance between speed and context, this strategy provides a compelling framework worth mastering.